Configure Packet Capture
Before Trisul can analyze traffic, it needs access to raw network packets. This page helps you choose the right packet acquisition method based on your network size, speed, and deployment model.
Choose the Right Method:
Use the option that best matches your environment:
- Port Mirror (SPAN)– rBest for most enterprise networks with links below 500 Mbps.
- Network Taps– Recommended for high-speed links above 500 Mbps, where SPAN ports become unreliable or lossy.
- Bridges– Suitable only for small offices or appliance-style deployments, where Trisul can be placed inline.
Virtual Machine Configuration
If Trisul is running inside a virtual machine, ensure the virtual switch is in promiscuous mode. Without this, mirrored traffic from the physical interface may not reach the probe.
Refer to the official documentation for [VMWare] environments for setup instructions.
Configuring Port Mirror / SPAN Port
Port mirroring copies traffic from one or more switch ports and sends it to a designated monitoring port connected to the Trisul Probe.
Typical use case:
- Enterprise access or aggregation switches
- Moderate traffic volumes
- Quick deployment without additional hardware
Example:
Traffic from ports ge/0/0/1 and ge/0/0/12 is mirrored to ge/0/0/6, which connects to the Trisul Probe.
Refer to your switch vendor’s documentation for configuring SPAN sessions. [CiscoSPANdocumentation]
The following diagram shows how you can configure a SPAN port and feed packets into Trisul.
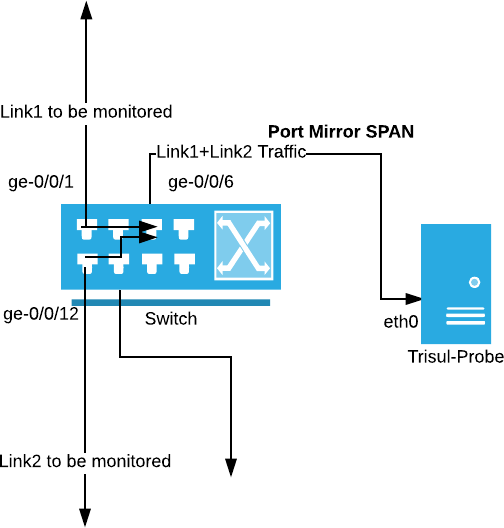
Figure: Port Mirroring
Using Network Taps
As traffic rates increase, SPAN ports can drop packets or distort timing. Network taps solve this by passively copying traffic directly from the link.
When to use taps:
- Links above 500 Mbps
- 10G or higher optical or copper links
- Environments where packet accuracy is critical
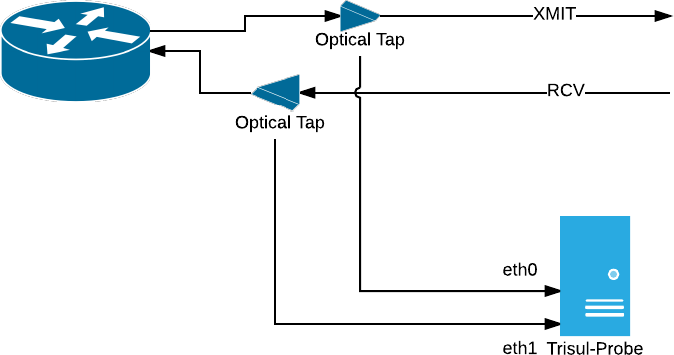
Figure: Network Taps
Note: For full-duplex links, each direction is tapped separately and connected to two probe interfaces.
Using Trisul as a Bridge
In small environments, Trisul can be deployed inline as a bridge, transparently passing traffic while capturing packets.
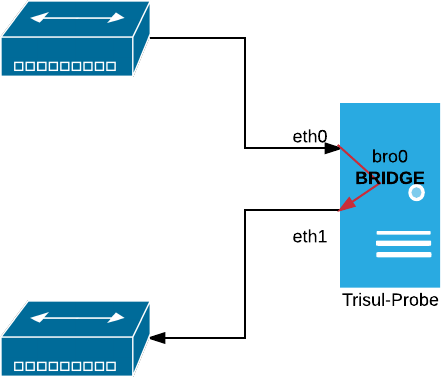
Figure: Bridge
Use this only when:
- Traffic volumes are low
- Inline deployment is acceptable
- You are running a small office or appliance setup
Bridge mode places Trisul directly in the traffic path. Not recommended for high-availability or high-speed networks.
Bridging Ethernet Connections
A bridge allows you to connect two or more network segments together allowing devices to join the network when it’s not possible to connect them directly to a router or switch
How to Bridge
UBUNTU
Install the bridge-utils package.
Copy: sudo apt-get install bridge-utils
Automatically Create the Bridge at Start-up.
Sample: /etc/network/interfaces file
 BASH#eth0
auto eth0
iface eth0 inet manual
up ifconfig eth0 up
#eth1
auto eth1
iface eth1 inet manual
up ifconfig eth1 up
#bridge br0
auto br0
iface br0 inet static
address 192.168.2.79
gateway 192.168.2.1
netmask 255.255.255.0
bridge_ports eth0 eth1
Restart networking:
sudo /etc/init.d/networking restart
CENTOS
Install the bridge-utils package.
yum install bridge-utils
To create a network bridge, create a file in the /etc/sysconfig/network-scripts/ directory called ifcfg-br0
Sample /etc/sysconfig/network-scripts/ifcfg-br0
DEVICE=br0
TYPE=Bridge
IPADDR=192.168.2.78
GATEWAY=192.168.2.1
NETMASK=255.255.255.0
ONBOOT=yes
BOOTPROTO=none
NM_CONTROLLED=no
DELAY=0
To complete the bridge another interface is created, or an existing interface is modified, and pointed to the bridge interface
Sample: /etc/sysconfig/network-scripts/ifcfg-eth0
DEVICE=eth0
TYPE=Ethernet
HWADDR=AA:BB:CC:DD:EE:FF
BOOTPROTO=none
ONBOOT=yes
NM_CONTROLLED=no
BRIDGE=br0
Sample: /etc/sysconfig/network-scripts/ifcfg-eth1
DEVICE=eth1
TYPE=Ethernet
HWADDR=AA:BB:CC:DD:EE:FG
BOOTPROTO=none
ONBOOT=yes
NM_CONTROLLED=no
BRIDGE=br0
Restart networking
/etc/init.d/netwok restart
With packet capture configured, the Trisul Probe can now observe live network traffic and start analysis.