IPDR Customers
The IPDR Customers list provides a comprehensive repository of customer details. This feature allows authorized users to:
Add: Create new customer entries with detailed information Edit: Update existing customer records as needed Delete: Remove customer entries from the list
This functionality enables efficient management and maintenance of IPDR customer data.
👉 Go to Context:default → Admin Tasks → IPDR Customers

Figure: Showing IPDR Customers List
Adding Details of a New Customer
To add a new customer, click the Add button and complete the required fields:
| Field | Descriptions |
|---|---|
| Name | Enter the customer's full name |
| Address | Enter the customer's physical address |
| Enter the customer's primary email address | |
| Phone Number | Enter the customer's primary phone number |
| Alternative Phone number | Enter the customer's alternative phone number |
| User ID | Enter the Unique Identifier of the customer. (Example: NB4002) |
And click Create.
Importing New Customer Details
When importing new customer details into the system, please note that it will override any existing customer information. To ensure that all customer details are retained, follow these steps:
- Export Existing Customer Details: First, export the current list of customer details from the system. This will prevent any loss of existing data.
- Combine New and Existing Customer Details: Add the new customer details to the exported list, ensuring that all information is accurate and up-to-date.
- Import Combined Customer Details: Import the combined list of customer details into the system. This will update the system with the complete and accurate customer information.
By following these steps, you can ensure a seamless integration of new customer details without overwriting existing data.
Importing
👉 Go to Context:default → Admin Tasks → IPDR Customers
To import IP to customer mappings for IPDR, follow these steps:
- Click the Import button located in the top right corner.
- Browse and select the CSV file containing the IP to customer mappings, with one mapping per line.
- Click Upload CSV File to initiate the upload process.
Exporting
👉 Go to Context:default → Admin Tasks → IPDR Customers
To export the details of existing IPDR customers, follow these simple steps:
- Navigate to the IPDR customer list page.
- Click the Export button.
The system will automatically export all IPDR customer details in CSV format.
CSV File Format
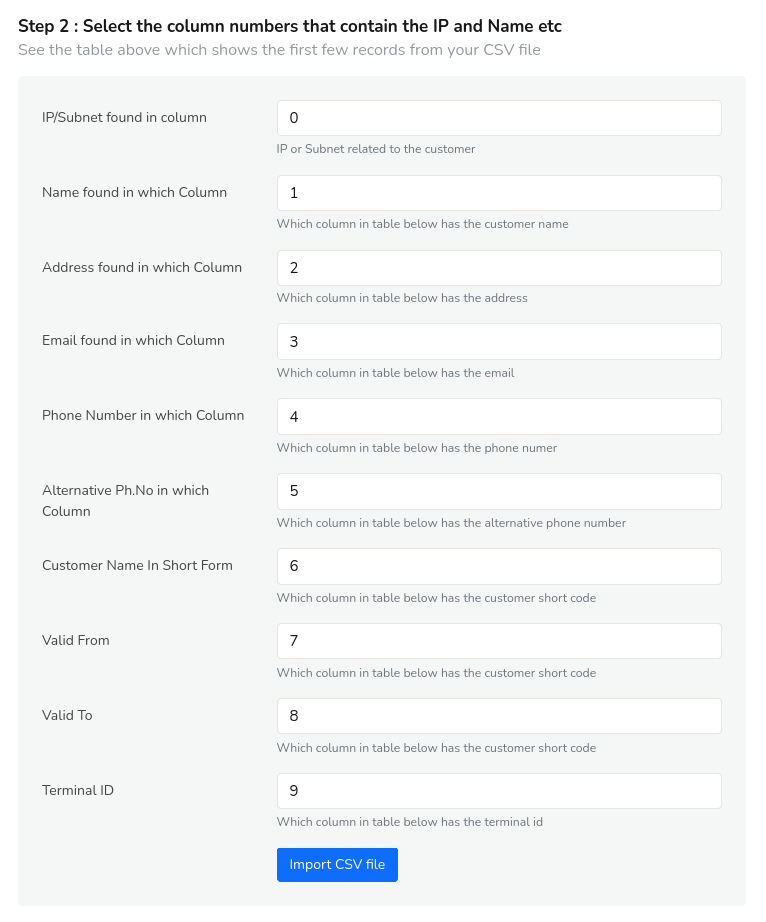
The CSV file should have a specific format, with each line containing nine columns. Each column represents a detail of the customer or subnet. The following default date settings apply when importing IP to customer mappings:
- Valid From: If no date is specified for "Valid From," the system defaults to January 1, 1970 (Epoch timestamp: 0).
- Valid To: If no date is specified for "Valid To," the system assumes the validity period is perpetual, with no end date.
These default settings can be adjusted or overridden during the import process or after importing the data. Sample:

Figure: CSV Format showing nine columns
The default mapping of all the columns to customer and subnet details can be modified in the UI after importing the CSV file.

Figure: CSV Format
Delete All
To delete all the details of the customers, click on the Delete All button on the top right corner. You cannot recover the details of the customers once deleted.
Action Button
Click on the action button against each customer to edit, delete, or add/edit subnets
Add/Edit Subnets
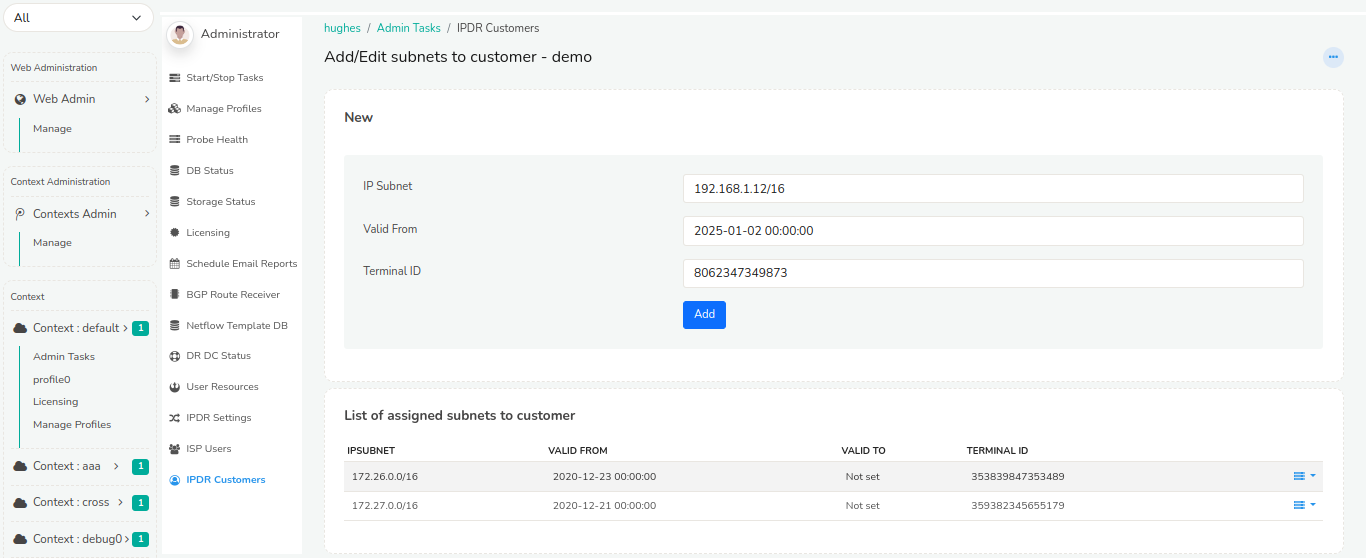
To manage subnets and terminal IDs, click on the Add/Edit Subnets option from the action button dropdown. This will prompt you to enter the following details:
| Field | Description |
|---|---|
| IP Subnet | Enter the IP subnet address in CIDR notation |
| Valid From | Select the date from which the subnet will be valid from. |
| Terminal ID | Enter the unique identifier for the terminal device associated with the subnet. |
 Figure: Showing IPDR Customers terminal IDs with subnets
Below that are the list of assigned subnets to customer containing details such as
| Column | Descriptions |
|---|---|
| IP Subnet | Displays the IP subnet in CIDR notation. |
| Valid from | Shows the data from which the subnet invalid. |
| Valid to | Displays the date until which the subnet is valid. By default it is set to "not set" indicating perpetual validity. |
| Terminal ID | Lists the unique identifier for the terminal device associated with the assigned subnet |
Click on the action button against a subnet for two options say
- Set Expiry
- Delete
Click on Set Expiry to set "Valid to" date for the selected subnet that shows the flows until the set expiry date but not the customer details in the report. Click Delete to delete that particular subnet.