Users
Manage users and their access levels.
Types of Users
A brand new install of Trisul has two users pre-provisioned
- admin - username
adminand passwordadmin
The admin login must be used to perform all tasks that involve system
configuration change, starting and stopping Trisul processes, user and
role management.
- user - username
userand passworduser
The user login is for all other operations, such as viewing and scheduling reports, packet analysis, viewing alerts, and the other tasks an operator does every day.
After your first login, change the passwords of both built-in users. See Change Own Password and Reset password by admin.
Create a New User
Login as admin user to create a new user
👉 Select Web Admin → Manage → Users
- A list of current users is shown
- Click Create a new user button
- Fill up details below
| Field | Description |
|---|---|
| User Name | Login name for user, no spaces, keep it short |
| Authentication | User can use LDAP password to login |
| Password | Password for local authentication of the user |
| Password Again | Repeat the password again |
| Full Name | The long name of user |
| (Optional) Email address associated with the user account. Required only when using Email OTP as the Two-Factor Authentication (2FA) method. | |
| Mobile Number | (Optional) Mobile number associated with the user account. Required only when using SMS OTP as the Two-Factor Authentication (2FA) method. |
| Role | WebTrisul user role. See Roles. |
| Allow multiple Login | Allows concurrent login option to user. The tickbox is checked by default which means concurrent logins are allowed. When unchecked, If a user logs in with an ID that is already logged in, the older login session will be terminated. |
| Default Dashboard | If you set a Default Dashboard, the user will be taken directly to that dashboard after logging in. |
| Default Home Page URL | If you set a Default Home Page URL, that takes priority over the Default Dashboard. After logging in, the user will be taken to the specified page (it can be any page, not only a dashboard). Users can also set their own home page by clicking the Home 🏠 icon from within their dashboards. |
| Allowed Context | Restrict user to these selected contexts only |
| Change User Avatar | Click to choose file and upload the avatar to set it as user avatar. This shows in the top right of the page. |
For LDAP Login User Name should be LDAP filter attribute value.
For Example if you specified Email as filter attribute in LDAP domain
configuration then you need to enter the users email attribute in the User Name field.
Changing Avatar Logo
👉 Select Web Admin → Manage → Users
Click on the Edit option (from the action button) against the user and in the Change User Avatar field Click Browse to choose a file and upload the avatar to set it as user avatar. The figure below shows the user avatar.
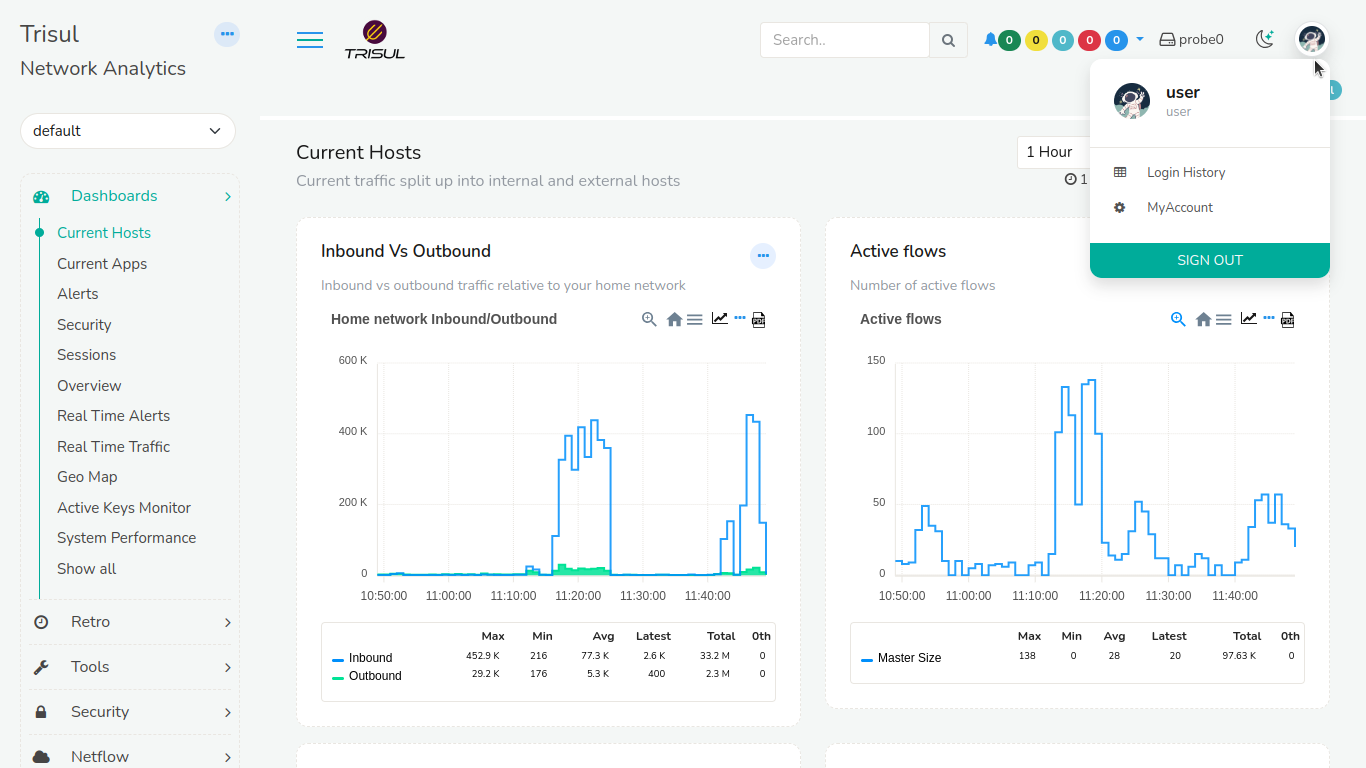
Figure: Avatar Logo
Edit Existing User
Log in as admin to edit a user.
👉 Select Web Admin → Manage → Users
Click the Edit option (from the action button dropdown) against the user and modify the fields.
Reset Password
In the Admin Operations button from the top right corner, click the Reset password option. You will be shown the new automatically generated password (This can be viewed only once). Please send it to the user and have them create a new password immediately on login.
Delete User
You have to have admin rights as well as the user you are trying to delete must be logged off.
Log in as admin to delete a user.
👉 Select Web Admin → Manage → Users
Click the Delete option (from the action button dropdown) against the user
Change Own Password
- Click the Account button at the upper right hand side of the page to open the dropdown menu and
- Click My Account
- Click Change Password button to change your password.
Reset password by admin
The admin user can reset the password of any user.
👉 Select Web Admin → Manage → Users → Select Edit (from the action button dropdown) against any user.
Select Reset Password from the Admin Operations menu button on the top right corner.
Generate API Token
Trisul supports login as well as API access using a login token for any user you choose.
👉 Select Web Admin → Manage → Users → Select Edit (from the action button dropdown) against any user.
Select Generate Login Token from the Admin Operations menu on the top right.
You will get a API Token like the one shown in the figure below, you can copy and share it with the user.
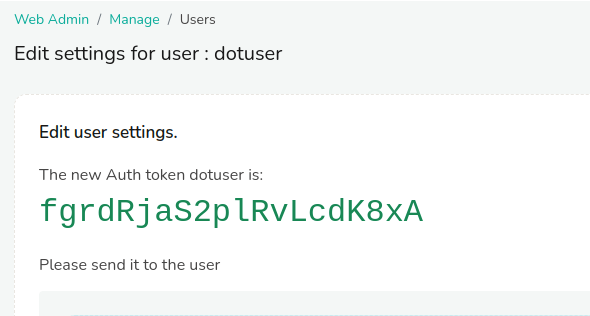
Figure: API Token for user
This token can be viewed again by
👉 Clicking View Login/API Token from the Admin Operations menu on the top right.
Changing Super Admin Name
👉 Select Web Admin → Manage → Users → Select Action button against admin user.
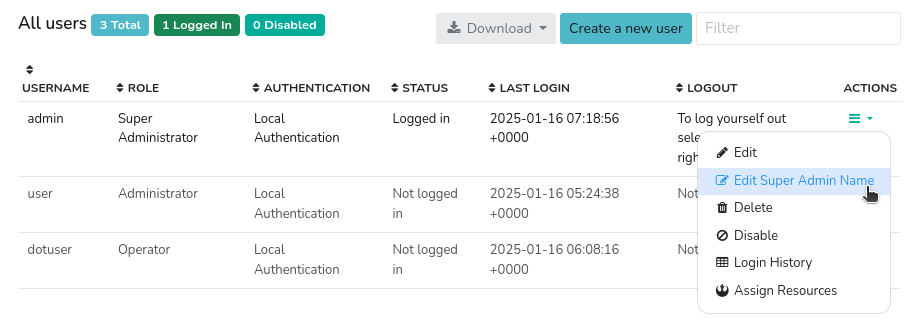
Figure: Changing Super Admin Name
To change the Superadmin username, click the Action button next to it and select Edit Super Admin Name. In the dialog box, enter the new name, click Update, and the change will appear immediately in the top-right username display.
Username Guidelines
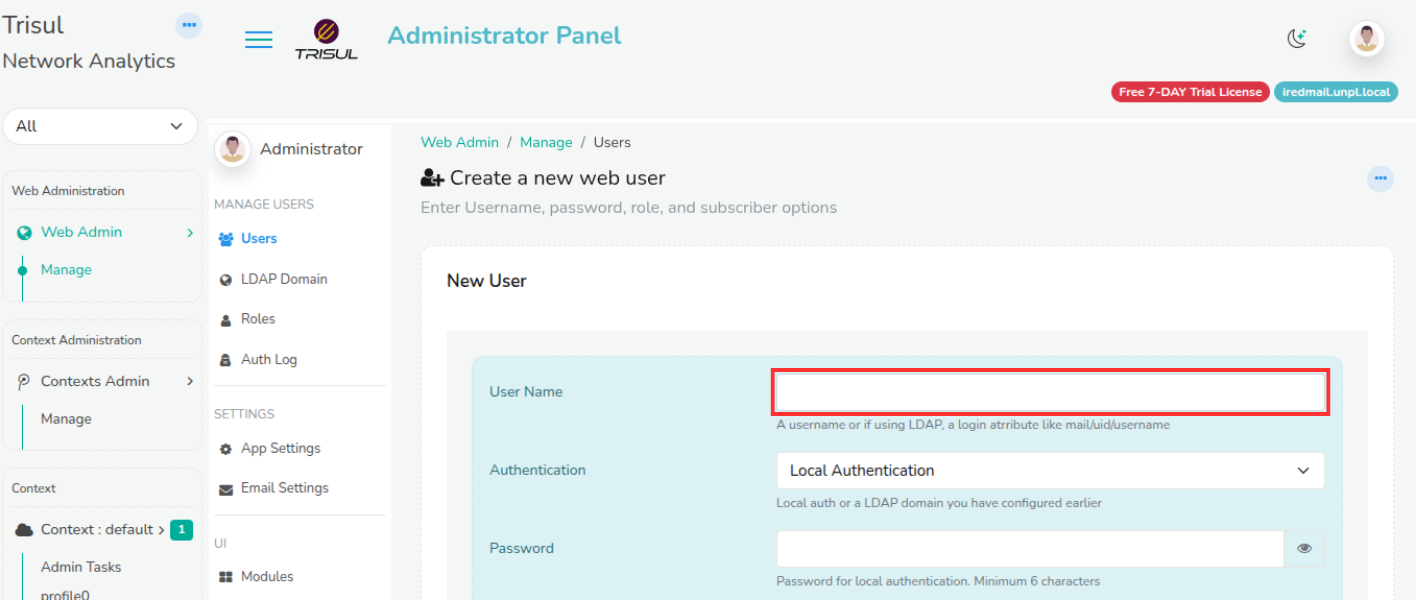
Figure: Showing Username in Webadmin
- There are no specific constraints for choosing a username.
- You may use any username that is not already taken.
Password Guidelines
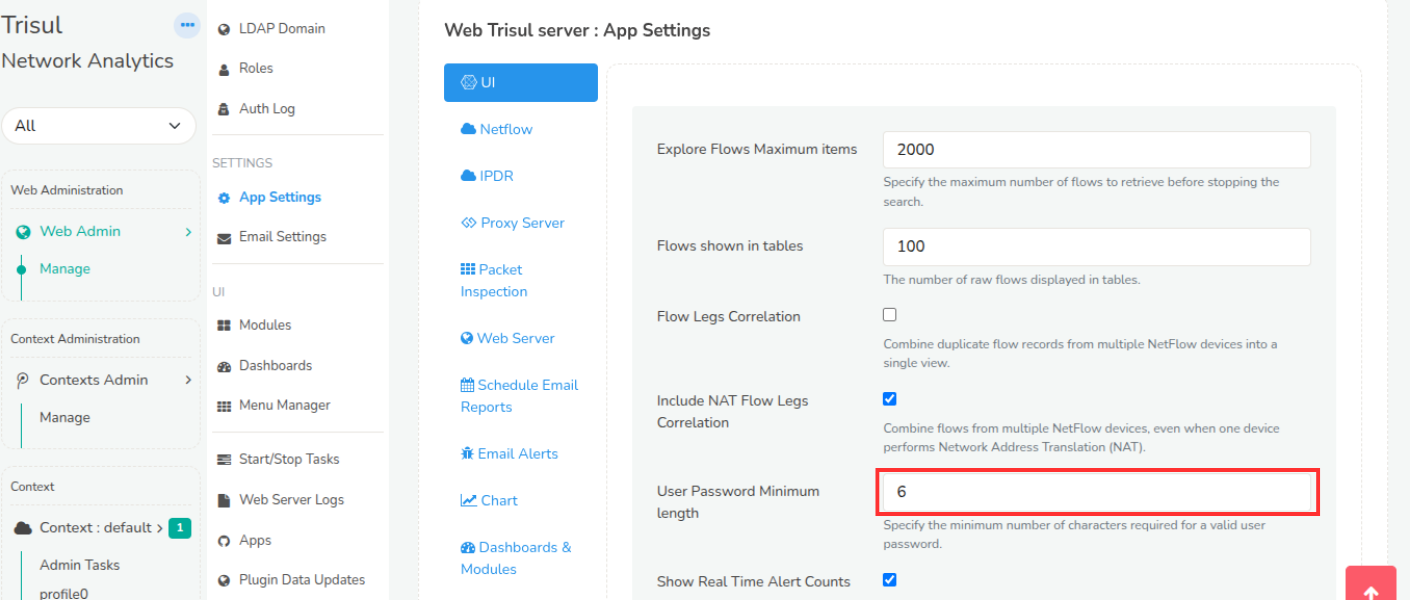
Figure: Showing Password Minimum Length in Webadmin
- There are no restrictions on the characters you can use in your password.
- Passwords are case-sensitive.
- You can include repeated characters, special characters, numbers, or any combination.
- The only password constraint is the minimum number of characters i.e.length which can be customized through the App Settings → UI and specify the minimum number of characters by specifying in the "User Password Minimum length".
Password Policy
Administrators set the password policy in Web Admin → Manage → App Settings → Password/Security: password expiry, password history, maximum failed login attempts and account lock duration. See Password/Security.
You can change your password at any time. See Change Own Password.
Configure Two-Factor Authentication (2FA)
Trisul allows administrators to enable Two-Factor Authentication (2FA) for individual users, providing an additional layer of security during login. Users can authenticate using one of the supported verification methods, depending on the system configuration.
- Navigate to Web Admin → Manage → Users.
- Locate the required user.
- Click the Actions menu.
- Select Setup 2FA.
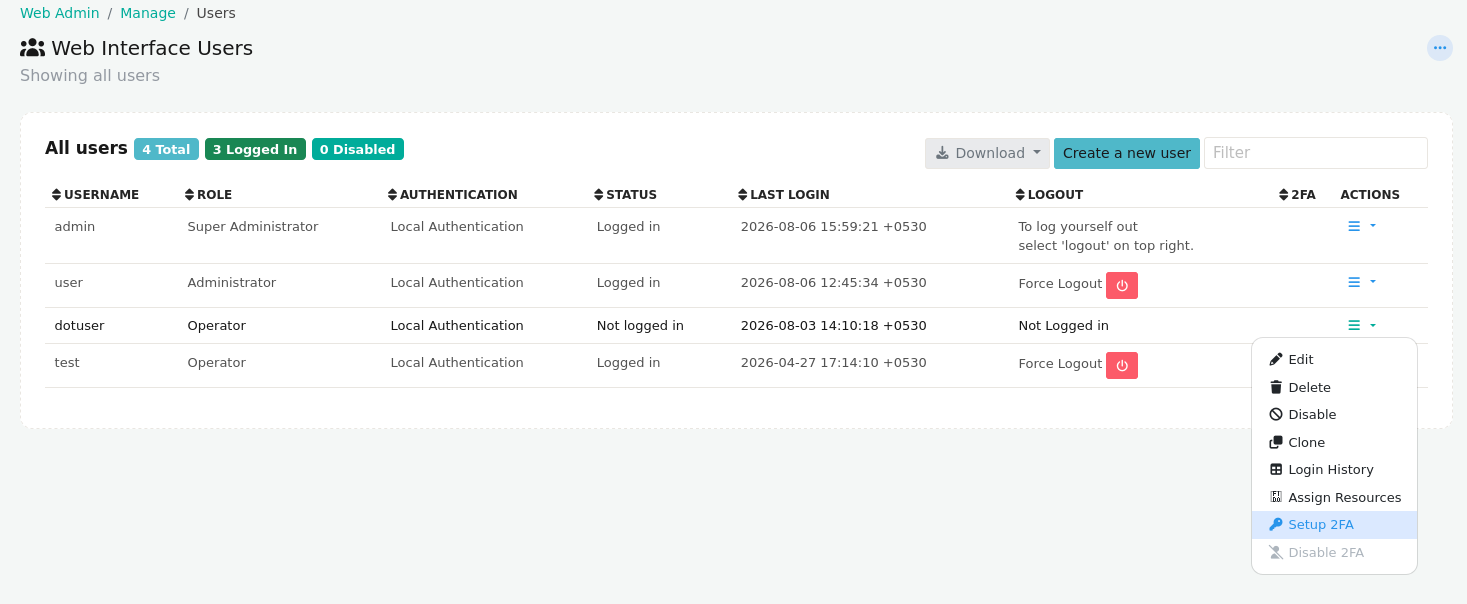
Figure: Navigation to 2FA Setup
Select an Authentication Method
The setup wizard displays the available authentication methods. The methods shown depend on the system configuration and the user's account information.
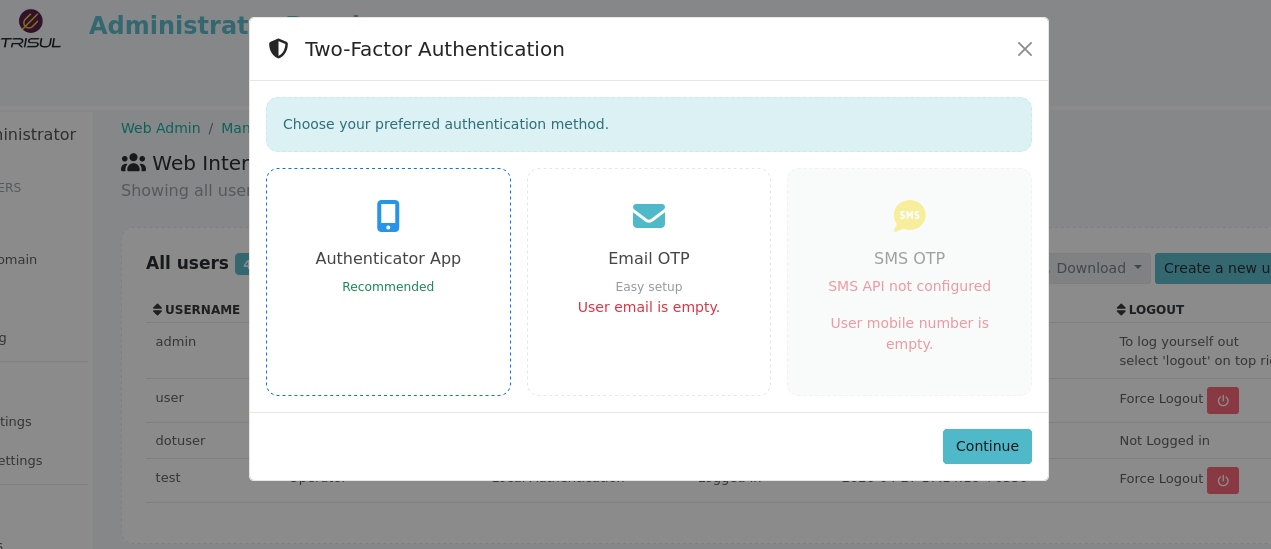
Figure: Selecting 2FA Method
The available authentication methods are described below.
| Authentication Method | Description |
|---|---|
| Authenticator App | Uses a Time-based One-Time Password (TOTP) application such as Google Authenticator, Microsoft Authenticator, or Authy. This is the recommended authentication method. |
| Email OTP | Sends a one-time verification code to the user's registered email address. This option is available only if the user has a valid email address configured. |
| SMS OTP | Sends a one-time verification code to the user's registered mobile number using the configured SMS gateway. This option is available only if SMS gateway settings are configured and the user has a registered mobile number. |
If a required prerequisite is missing, the corresponding authentication method is displayed as unavailable.
Configure Authenticator App
- Select Authenticator App and click Continue.
- A QR code is generated for the user account.
- Open your preferred authenticator application.
- Add a new account by scanning the displayed QR code.
- Enter the six-digit verification code generated by the authenticator application.
- Click Enable to activate Two-Factor Authentication.
After successful verification, the user must provide a valid authenticator code during every login.
Configure Email OTP
- Select Email OTP and click Continue.
- Verify that the displayed email address is correct.
- Click Send Email OTP.
- Retrieve the verification code sent to the registered email address.
- Enter the six-digit verification code.
- Click Enable.
The user will receive an email-based one-time password whenever authentication is required.
Configure SMS OTP
- Select SMS OTP and click Continue.
If SMS notifications are configured and the user has a registered mobile number, Trisul sends a one-time verification code to the user's mobile device.
- Request the SMS verification code.
- Enter the received verification code.
- Click Enable.
SMS OTP is available only when:
- An active SMS gateway has been configured under Web Admin → Manage → SMS Configurations.
- The user account has a valid mobile number configured.
Disable Two-Factor Authentication
To disable Two-Factor Authentication for a user:
- Navigate to Web Admin → Manage → Users.
- Click the Actions menu for the required user.
- Select Disable 2FA.
Once disabled, the user will authenticate using their configured primary authentication method without requiring a second verification factor.