Email Settings
This section explains the basic steps that are needed to configure email server and forward email alerts.
Email Server Configuration
👉 Go to Web Admin: Manage→ Email Settings
This is where you configure the email addresses that you want to be sent from and the recipient email addresses.
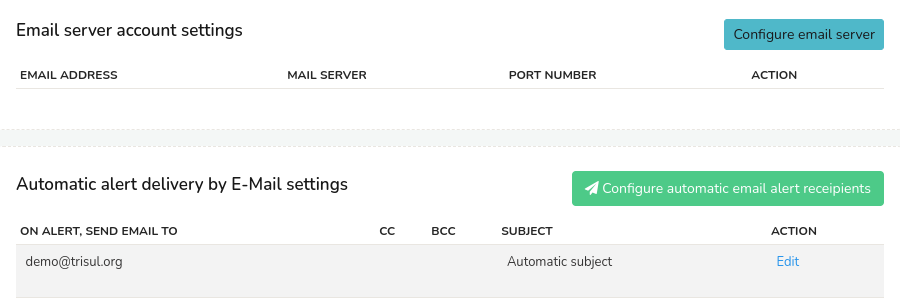 Figure: Email Account Settings Module
In this window, Click on Configure email server. And a form with the following details opens up. By filling up the fields appropriately, you can configure an Email server using which Web Trisul will send outgoing mails.
| Fields | Description |
|---|---|
| Email Server | Hostname or IP of the SMTP server |
| SMTP Port Number | SMTP Port (Usually 25. For Gmail use 587) |
| Authentication Protocol | Click from the drop down list of authenticaton protocols |
| From Email Address | This is displayed as the sender's address on the recipient's inbox |
| Password/API Key | Email Password,API Key,or Provider password like pepipost,sendgrid |
| Disable SSL Cert verification | Disable certificate verification. Eg, if your email server uses self signed certificates |
| SMTP Relay User (optional) | Use this to send SMTP email via relays like sendgrid,mailchimp,pepipost etc. This is the user id given to you by the provider. Leave it blank if not required |
Once providing all the fields, Click Save and the email server configuration for outgoing mails is done.
As you click Save, you can see the configured email server account settings as in the figure.
 Figure: Configured Email Accounts
It contains the details of email server configuration as in the following.
| Column | Description |
|---|---|
| Email Address | This address will be displayed in the "From" field of emails sent by Web Trisul. |
| Mail Server | Host name of the SMTP server that handles the outgoing mails. |
| Port Number | Port number used by mail server for outgoing emails. |
| Action | Dropdown options to performa a number of actions including edit, delete, send a test mail, and remove an email id from all reports. |
Action
i) Edit: Click to modify the configured email server settings.
ii) Send a Test Mail: Click to send a test mail to verify successful configuration.
iii) Delete: Click to delete the selected email server configuration setting.
iv) Remove an Email ID from All Reports: Click to exclude the selected email id from reports.
Ensure Who Receives the Alert Emails
Again, from the Email server account settings, Click Configure automatic email alert recipients. This is where you specify where to send emails when alerts fire.
Provide the following fields to configure automatic email alert delivery to the recipients.
| Fields | Descriptions |
|---|---|
| Send alerts via email To | Email address of receiver. You can only enter one address, use cc to add multiple |
| Cc | Add multiple recipient addresses seperated by comma(,) |
| Bcc | Add multiple recipient addresses seperated by comma(,) |
| Signature | Enter a block of text that can be automatically appended to the end of your email |
Once providing all the fields, Click Save and the configuration for automatic email alert delivery to the recipients is done!
Edit Configured Email Alert Recipients
You can modify the configured email alert recipients by clicking on the Edit Button.
 Figure: Edit Email Alerts Receipients